Thursday, June 7, 2012

Greenhouse

One of the major features of the compound is the greenhouse. This was installed in fall of 2009. We went with a passive geodesic system that comes as a kit. You can hire an experienced installer from the company that makes the kit to assist/lead the build. It's made by Growing Spaces and is 33' in diameter, about 700 square feet.

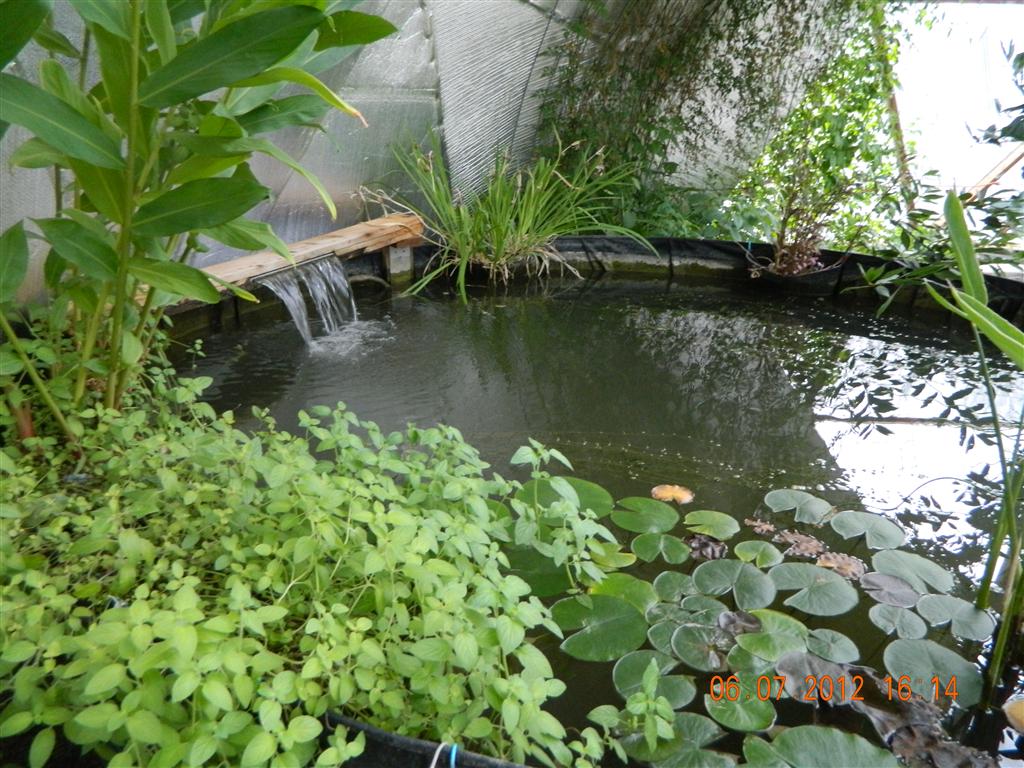
The features of this particular greenhouse that sold me on it was the maximization of passive design. A reflector on the north wall focuses low angle winter sunlight on a +-7' diameter pond/pool inside the greenhouse. The pool is warmed in the daytime and cools, releasing the energy at night, pretty much preventing any freezing even here in central PA. A small pump and waterfall keep the water oxygenated (and the goldfish happy) and prevents temperature stratification. It also has small fans that circulate warmer daytime air through 4" tubes under the soil, keeping soil temperatures warmer. It has automatic temperature controlled vents and drip irrigation from Dripworks so it's self watering and self thermo regulating.

This allows growing of cool tolerant plants into and through winter (though growth slows a lot when solar energy is low). Also enables growing of things like tomatoes and peppers earlier (and peppers love the greenhouse). It also allows growing a few things that would not live in this zone, such as a bay leaf tree and some Jasmine.

It's also a peaceful and nice place to garden and work, even in winter.


The stem wall goes directly on packed gravel, no foundation needed.


The higher framework is built working off of scaffolding.


First piece of glazing is going up.


Shell almost complete!


The north wall reflective material is stapled into place.


Clay drilling the holes in the sheet metal that will be painted and bolted together to form the water tank/pond. 


Painted!


 Together and lined!


 I used landscaping blocks to build the walls of the beds inside the greenhouse.


The crew post build! Dad was super instrumental as always, Chelsea did an immense amount of the build work, Amanda and the Growing Spaces crew round out the major players! 


Together! The pink insulation board was eventually buried, it's one more piece of protection against freezing.


Roof!

The roof is on and done, a huge milestone. We went with a rather affordable metal roof, Valspar energy star bronze paint, installed by the Amish. The roof lines look excellent and interesting and the install went smoothly. It's nice that the interior is quite dry and stays that way even in pretty big rain.

We decided not to install the stock Deltec coupla roof and put a curb mount type Sun Tunnel by Velux at the peak. We like the look better and it seems to let quite a bit of light into the center of the house.

Masons are close to wrapping up, pond is almost fully functional, garage and front doors should arrive next week, earthwork proceeds as the masons finish areas.


Monday, May 21, 2012

Front Porch

The front porch was a pleasant surprise. In the design phase we knew we wanted a front porch as integration of outside and outside areas is important and entry's are visually important. We also wanted something a bit different than the stock roof over decks, both for visual differentiation from the rear and to have outside spaces that feel different.

Deltec had a handful of front porch options, we picked the one that the footprint and overall feel best matched our house vision, it was a 5 minute decision and one we didn't reopen or pay much attention to. We didn't even think about what it was made out of, really how it would look, there were limited choices, we picked the one that worked for us and never looked back.

When it was unloaded from the truck, I was a bit shocked. It had massive cedar post and beams, was made by an outside specialty timber frame company and looked much more super than I expected. It's also very tall with the tall house walls, almost Buddhist templeish.


The porch components inside on the main floor.


A late night of us sanding all sides of each piece of wood.


 A sanded piece next to an unsanded piece. Sanded on left.


The temple being erected.


Most of the skeleton up.

The main entry view.


Almost complete! The porch got rained on partway through erection, so it needs a light sanding prior to weather protection (LandArc) being applied, but those two steps will finish it. The view/seating from the front porch is quite nice. Kristina determined that we should not have a window to the right of the front door so seating could be out there and not block a window, that was a very good call. The micro window on the left of the main entry will be a bathroom window.

Tuesday, May 8, 2012

Where wood comes from. Part 1.


One of the sub-projects of the larger house building project has been harvesting trees on the property. The goal of this is to make wood from those trees into finished boards for the house. Not the structural 2x4's and such, but wood for ceilings, floors, window trim, probably a lot of the solid wood for cabinetry.

There were four large trees, an oak, a cherry and two hickory (sounds like the start of a joke) that were in the area that needed to be cleared for the house. I didn't want to just use them for firewood, which really pushed me to make this project happen. There were also a lot of large ash on the property which were dying from ash yellowing and also threatened (though not yet infected) by emerald ash borer. A stand of basswood and a few other fence row trees (two good sized cherry, another oak and a hickory and a wind downed maple) rounded out the trees to become the house.

 Some of the larger trees were felled by excavator so the root system would pull out and to ensure a slow fall so the wood was less damaged.


Yes, that was a huge freaking tree.

This certainly made me think of Shel Silverstein's "The Giving Tree", if you haven't read it lately it's worth checking out of the children's section of your local library.


Once the trees are felled, then the logs get cut to a manageable length, in this case under 12' long. Then carried with the skid steer to the cul-de-sac where a local gentleman with a portable sawmill did the cutting into boards. He charges by the board foot (a 1" thick length of board of 1 square foot of area, a 2" thick board would only be 0.5 sq foot of area to equal a board foot).


It's hard to see without clicking to see the larger version, but the logs are piled by species and length. In the second picture the log mill is up and running on the right. Portable sawmill. The sawmill is basically a big bandsaw on a sled that is pushed with the blade slicing through the log. The log stays stationary for each cut. It's an impressive system. The one used for this project was pretty small and very manual, there are much larger hydraulic units where logs are rotated and the saw moves via hydraulics and belt systems. It took around 5 weekends of cutting with me restocking the cul-de-sac with logs during the week to get all the trees I wanted to use cut into boards.

Next the wood has to be transported from the spot it was cut, stacked with spacers (called stickers by the professionals), the ends painted with a wax (Anchor Seal) to prevent the ends from drying too quickly and splitting (though we painted a lot of the logs before they were cut to make this easier), the stack roofed so it doesn't get rained/snowed on, shade cloth wrapped around the stack of wood again to prevent rapid drying and to mitigate some blowing rain,  all on a super duty pallet so I can use the skid steer to carry around full pallets. All these steps were mini-projects, figure what to use for the 2000+ stickers, make them, figure out how to stack and sticker wood, stack and re-stack, figure out how to make pallets, get materials, make a stack of pallets, figure out what works for a roof, gather materials, make roofs, research shade cloth, get it in and figure out how to install it. Elise and Aaron were key players in making these wood drying steps and activities happen.


 Here's a picture of one full, roofed and shaded stack and a couple partials. We ended up with 8 full stacks and 1 partial, totaling about 8,000 board feet of rough cut lumber.


In addition, piles and piles and piles of firewood were generated. The "slabs" (sides of wood with bark that get sawed off) account for a lot of wood. Tree tops and logs that are too twisty added a significant amount of wood as well. There is still a lot to cut and then split. Some may sit and rot, but there was probably 4-5 winters of firewood heat for a average size/insulation home generated as a side bonus to this project.


Next post will be about what happens when the rough cut lumber gets to the shop to become boards!


Friday, May 4, 2012

Post Frequency Change

Hi, I'm changing my post style from a what was accomplished today/this week to a project by project type of format.

For instance at the moment we are working on the front porch, masonry, raising baby chickens, refurbishing some deck furniture, finishing a bunch of wood cut from the land for ceiling/floor/trim, Roof will be soon, lining the top leaky pond, CREP planning, and probably a few others.

My intent is to post on these items as they reach some sort of conclusion or point of interest rather than posting small day to day changes. So the blog has not petered out, just shifted in use, though this does coincide with the summer busy work season which will be a slow blogging season.

Thursday, April 26, 2012

To CREP or not to CREP, that is the question!

Most of my posts lately have been on the house building process and progress, which has been moving pretty quickly and has provided lots to photograph and share. I have a fairly large list of other items to ponder in this forum, today's topic is CREP.

CREP is the Conservation Reserve Enhancement Program. Basically a federally and state funded program to take areas (such as areas around stream banks) that are better suited to conservation and planting of trees than corn/crops. The program funds planting with native trees and pays a rental rate to encourage people to keep them in trees and instead of farming the marginal/sensitive lands.

From USDA: "The Conservation Reserve Enhancement Program (CREP) is a voluntary land retirement program that helps agricultural producers protect environmentally sensitive land, decrease erosion, restore wildlife habitat, and safeguard ground and surface water."

I have a parcel of bottom land that was affordable to pickup because it was rejected by the county/town for a major subdivision because of wet bottom land soil. It's mostly farmed by a neighbor at the moment, the lower wetter CREP potential land has been in corn that doesn't seem to do great and the upper better for farming soils are in alfalfa.

I started looking into CREP as I thought having a buffer with some trees along the creek bed (it's a tributary to Little Fishing Creek that is dry most of the year) would be nice. However, it looks like quite a bit of the parcel has potential to be enrolled in CREP. I think the only thing that I would have liked to have done as part of this (which CREP doesn't offer) would have been to enhance some of the area into wetlands/do some wetland creation/stream meander restoration. There tend to be firms looking for streams to restore/wetlands to create, but that would turn into a major project. CREP seems to be fairly easy to work with and it's goals are in line with mine. A major wetland/stream project would probably be a major headache and distraction from the other facets of life I'm focusing on at the moment.

I'll probably enroll, though looks like the next window is really fall for planting CREP trees, so we have some time to figure it out and plan the effort. It sounds like they give you options as to what you want planted/the mix of trees so that will be a pretty cool project.


Friday, April 20, 2012

Amish Roofing Hit Squad


The Amish roofing team showed up at 6:15am while I was still staging materials and worked almost non-stop for ten hours. Stupendous progress was made. Sticky Ice and Water shield underlayment was put on the entire main house roof and the difficult to start roofing transition from main roof to connect roof was done along with completing the sheathing on the backside of the connect to the previously sheathed garage. They also got the skylights installed in the roof over deck roof. This means that the main round is now pretty much rainproof, which is great as storms are coming and the water does no good inside the house.

Elise and Aaron kept at foaming, sealing and tightening up the shell. They also packed the black van full to the roof with the paper backing off the ice and water shield that will head to the dump shortly.

Dad continued to complete section after section of deck framing and got the unplanned for rear deck ledger boards installed. Looks like we have enough pressure treated lumber leftover for the joists on that deck, which is pretty sweet (or pretty scary, where was it supposed to be used? Hmmmmmm....).

The Perryman brothers connected the stubbed out water, sewer, phone, electric and an extra empty conduit to the basement, so as soon as I get an electrician in I can get a breaker box setup and a few circuits put in by it so we don't need generators running.

So what is this ice and water shield I keep blathering about and why did I use it instead of regular roofing underlayment? The ice and water shield is a sticky backed 40 mil thick rubber/tar product with a PVC/plastic top side. It's this stuff. In my case I used the 300 series high temp version which is designed to be used under metal roofs which can get hot. It's commonly used (mandatory for energy star) in roof valleys which carry water. The rubber seals to penetrations (like all the nail or screws that hold a roof on) making a very effective shield against leaks.

I'm using metal roofing, but not standing seam metal roofing which hides the screw heads. Standing seam has an upslope side, so with lots of angle cuts (as this roof is like 20 pie piece shaped wedges) you really have a lot of waste. The exposed screw type metal is reversible, so all the cut pieces can be flipped 180 and used. The issue with exposed screws is that they have a rubber/silicone washer that seals against the roof to keep water from leaking in around the screw and rusting the screw holes and screws out. Those washers expire before the screws or roof (20-30 years) and water MAY leak in when that happens. At that point the washer/screw heads all need silicone seal to be slathered on them or they need to be replaced. The WIP 300 seals against the screw under the roofing, giving a second layer of insurance against leakage.

This is extra important when one insulates the roof with spray foam. The two types of foam (open cell and closed cell) both have some weaknesses against water. When exposed to leaks the open cell becomes a giant sponge and you probably don't know anything is wrong till it peels in a huge 10,000 pound mass off the underside of the roof and falls onto your bedroom ceiling. Closed cell repels the water, but traps it against the wooden roof sheathing and maybe even trusses, which then would rot, causing roof failure. Long and short is that preventing leaks with a super duty underlayment was cheap piece of mind and will result in longer term roofing performance.

I worked on site cleanup and staging of next weeks materials till after dark as it looks like rain is coming in this weekend and it's easier to do those things when it's not muddy. Long and short is I have fewer photos than I wanted to end the week. Maybe more tomorrow if the rain isn't too continuous.


Working!


Day's end!the two garage panels that are exposed plywood will have doors installed in them. We ordered those today, so that's in motion.


There are three sets of double skylights like these on the roofs over the rear decks.They really let a bunch of light in.


The front decks!